Rally pace note generation
I always wanted to do a rally-style demo for the Augmented Reality glasses, but first I'll need actual pace notes to display.
And there's no way I'm doing that manually.
What are pace notes?
One of the first racing video games I've ever played is Network Q Rally. The callouts ("easy left") stuck with me ever since.
If you've played with Dirt rally, or watched any amount of actual rally, you also might have heard all these callouts from the navigator. There are some good articles on what "Left three long maybe" means.
The way these notes are traditionally made is by the driver and navigator going through the path slowly, with the driver dictating the callouts, and the navigator taking notes. The driver usually does it by eye, but I've seen some more scientific methods too:
Apparently pace notes are highly specific to the driver and navigator, and there is absolutely no common standard. "R1" may mean super hard turn for one team, and the slightest, almost straight turn for another. Or they may not even use numbers, although that's dying out.
One other method of making pace notes is by using a device called Jemba C-rally, which has an odometer and an accelerometer, and records g-forces during the reconnaisance pass. Based on the speed and g-forces, it generates a bunch of notes. And since this was one of the first commercial devices to ever do this (afaik), their output is somewhat of a standard. E.g. Dirt Rally uses this standard too.
There's this ubiquitous image of their system which should explain it:
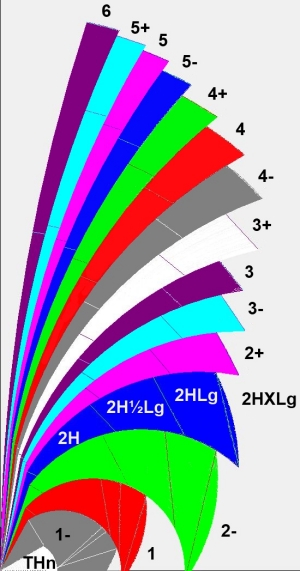
The tighter the turn, the smaller the number, and there's suffix for how long the turn actually is. The most important thing to remember is that turn tightness matters way more than the actual angle of it.
Keep in mind that generated notes will not contain important information like the turn being deceptive. So the auto-navigator will probably not say "Triple caution, stay center Samir!".
Prior art
There are multiple android applications that can auto-generate pace notes, but their method is not public.
I've also found an incredibly detailed blogpost about the topic, but it was way too complicated (and not really correct IMO) for my taste.
So let's implement one from scratch.
The algorithm
OK, so what we have is route in the form of GPS latitude/longitude pairs.
Since I've already integrated to a route provider, and needed more detailed route point data, I already had some pre-processing steps:
- Subdivide very long paths to 30 meter segments to make the outputs of the next step more consistent. This is done with simple linear interpolation between endpoints.
- Subdivide the path further with cubic interpolation, and make more or less consistent 3 meter long segments. More on this at the end of the article
So I can create consistently spaced point lists, which really simplifies finding turns.
Step 1: Classifying points
First step is determining the turn radius at every point. This is done by
selecting the point and its two neighbors 20-20 meters away (i.e. for point[i],
select point[i-7] and point[i+7]), and determining the radius of the
circle that's defined by these three points.
I quickly copy-pasted the formula from stack exchange into my rust code:
1 2 3 4 5 6 7 8 9 10 11 12 13 | |
The offset_from() method you see there calculates the "offset" between two
GPS coordinate objects, where x is "easting" (meters to east), y is altitude
difference and z is "northing". So in the above formula, current.position
sits on (0;0;0) of a local eucledian space, and its two neighbors get actual
coordinates which are used in the calculation.
Now that we have the radius, we can calculate the lateral g-force we'd see if we went into the turn at, say, 50km/h:
1 2 3 4 5 | |
All we have left to do per-point is to classify the turns. This
is where there's little to no information on what 1 to 6 actually means, so
I also made up my own: I say that comfortable lateral acceleration is 0.3g,
and the each turn severity class is a speed interval where the acceleration
reaches 0.3g:
- 1: 0-30km/h
- 2: 30-40km/h
- 3: 40-50km/h
- 4: 50-70km/h
- 5: 70-90km/h
- 5: 90-130km/h
- Straight: above 130km/h
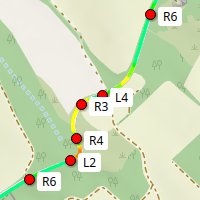
Ok, we classified the points. Let's see that with gps visualizer:
Looks good, and that 20 meters we chose at the beginning smooths out things quite nicely. How serendipitous :P
Step 2: Initial markings
We need to create some candidate notes from these individual points. Let's do the simplest thing and plop down a note wherever there's a change in severity:
1 2 3 4 5 6 7 8 | |
In the above code we save for each severity change the index of the relevant
point, and the severity (represented by a RallyMarking object) into a vector.
This gives us our first, very raw result:
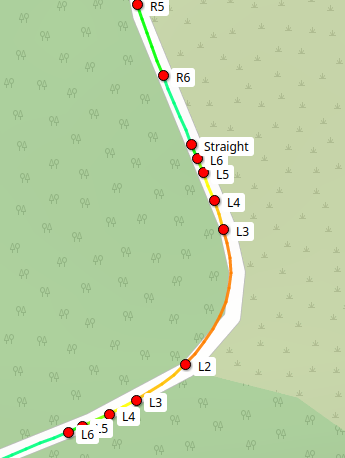
Step 3: Filtering descending severity
When driving, we don't really care about descending severity: if we are coming out of a turn, we have already slowed down, and also see that the turn is getting less-severe. We could make some intelligent, dynamics-based system here, where we see if the severity is actually relevant at some predicted speed, but that sounds way out of scope for now.
The algorithm is simple; we start from the back and remove any note that is less severe than the one before it:
1 2 3 4 5 6 7 8 | |
I know remove() is O(n), but we are talking about at most a few thousand
points, so I don't really care.
Notice how instead of the > operator, I use a very verbose
is_more_severe_than() method. This is because the > is very ambigous:
is it the turn numbering (R1 < R2), or severity (R1 > R2)?
A verbosely named method is more explicit and easier to read.
Also we do have to see if the two notes are even the same direction.
We don't want to collapse an R5 into an L4. Also, Straight is only "in the
same direction" with other Straights. This will make Straight into a kind
of a sentinel marking.
Anyway, we get this map:

Step 4: Collapsing ascending severity
When a turn starts... turning..., we are mostly interested in what its ultimate severity will be. So what we do is if we find two points with ascending severity, we collapse the more severe marking into the less severe marking: mark the less severe point with the more severe marking.
As one more sanity rule, we only do this if the markings are not that far apart: it is informative to have an R2 after a long R4.
1 2 3 4 5 6 7 8 9 10 11 | |
Remember that in the tuple .0 is the relevant point index, and .1 is
the actual marking.
This gives us the following:
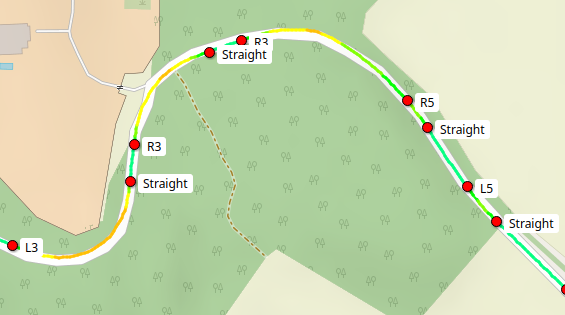
We could proably be a bit smarter on where the turn "actually starts", or at where it starts really mattering by calculating the braking distances and such, but that's way out of scope for now. It's better to signal a turn a bit too early than too late.
Step 5: Removing straights
As a final touch, we return Straight markings. We don't actually care
about straight parts, it was only used to make the algorithm more robust.
The driver will be more interested about the distance to the next turn.
1 | |
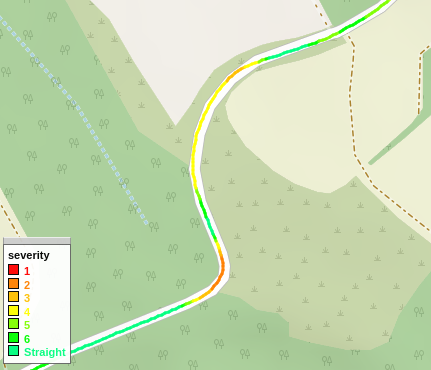
The results
The above algorithm gives us this final map, and I'm pleased with it. It's good enough for what it's going to be used for:
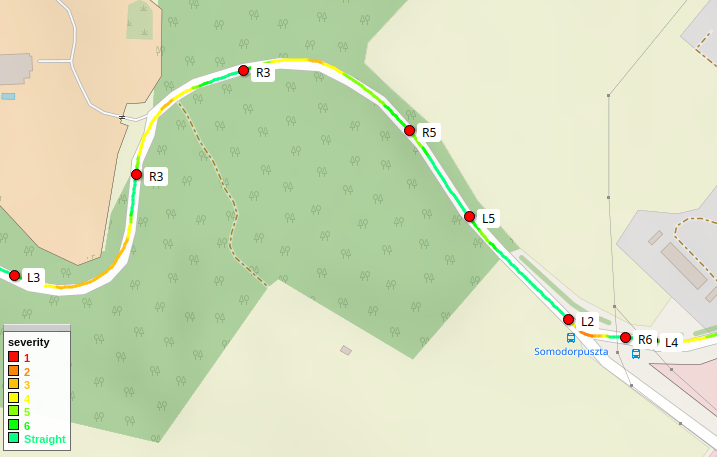
You can see it in action in our latest demo video too.
Side note: Route subdivision and cubic filtering
Back when I was integrating the map routes, I needed to create a more detailed route than just connecting the dots. Linear interpolation left an angular mess that didn't look good in 3D, even for the cyberpunk-y synthwave-y theme.
So first I went to my old favorite, Catmull-Rom interpolation. It's a special kind of Cubic Hermite spline with the special feature of calculating the tangents at the points from its neighbors. It looks like this:
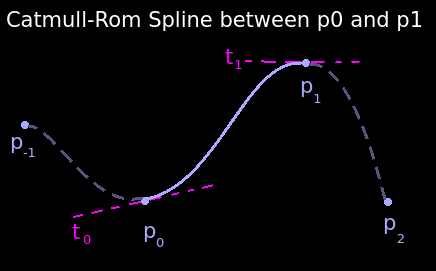
This is usually my go-to interpolation, since it guarantees a smooth curve between multiple points up to the first derivative.
Now my problem with it was... basically all 90° turns:
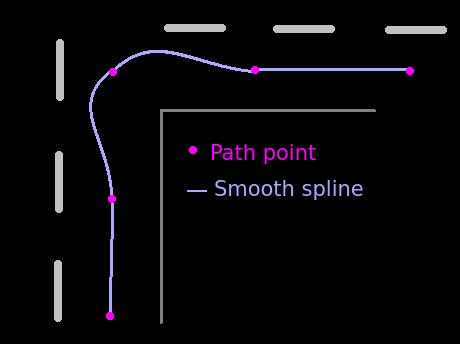
Since Catmull-Rom always goes through all points, it never cut corners but instead made this ugly shape.
So I decided to draw a spline between the centers of segments, with the segment being the tangent:
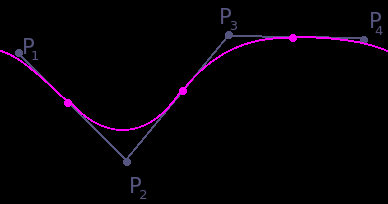
It's basically a quadratic Bézier curve.
I'll share the code for it too, because it is very elegant:
1 2 3 4 5 6 7 | |
Where lerp() is "Linear interpolation":
1 2 3 | |
Be aware that you cannot simply decimate this curve by
just incrementing t with some fixed amount, because it
will give you varying length segments.
What I did instead is the numerical route: go with super small increments and once the distance between two points reach the one I want, I record that and continue searching the next one. You could probably do some binary-search refinement instead of a very small step size, but if this is a preprocessing step, there's no need.
Anyway, this is the final result shown on a map:
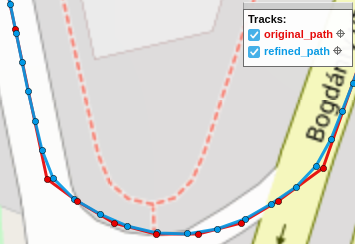

It cuts corners, but then so do I.
Rip and tear
Synthwave slides
If you need Augmented Reality problem solving, or want help implementing an AR or VR idea, drop us a mail at info@voidcomputing.hu